
Installing Services
Next, we introduce how to use the Manager to install TDH services to a cluster.
Upload Product Package
From version 6.0 onwards, Manager is installed as a separate product. The product package of each product shall be uploaded in the Application Market of Manager first, and then Manager will complete the unzipping automatically, which replaces the automatic unzipping process of previous versions, making it easier and more flexible to install the service. For example, users can upload different versions of the product package to install different versions of the service.
Kindly note
For the package name of TDH, please refer to the Section Installation Media.
If users have just completed the node installation of the first cluster, users may enter the following interface:
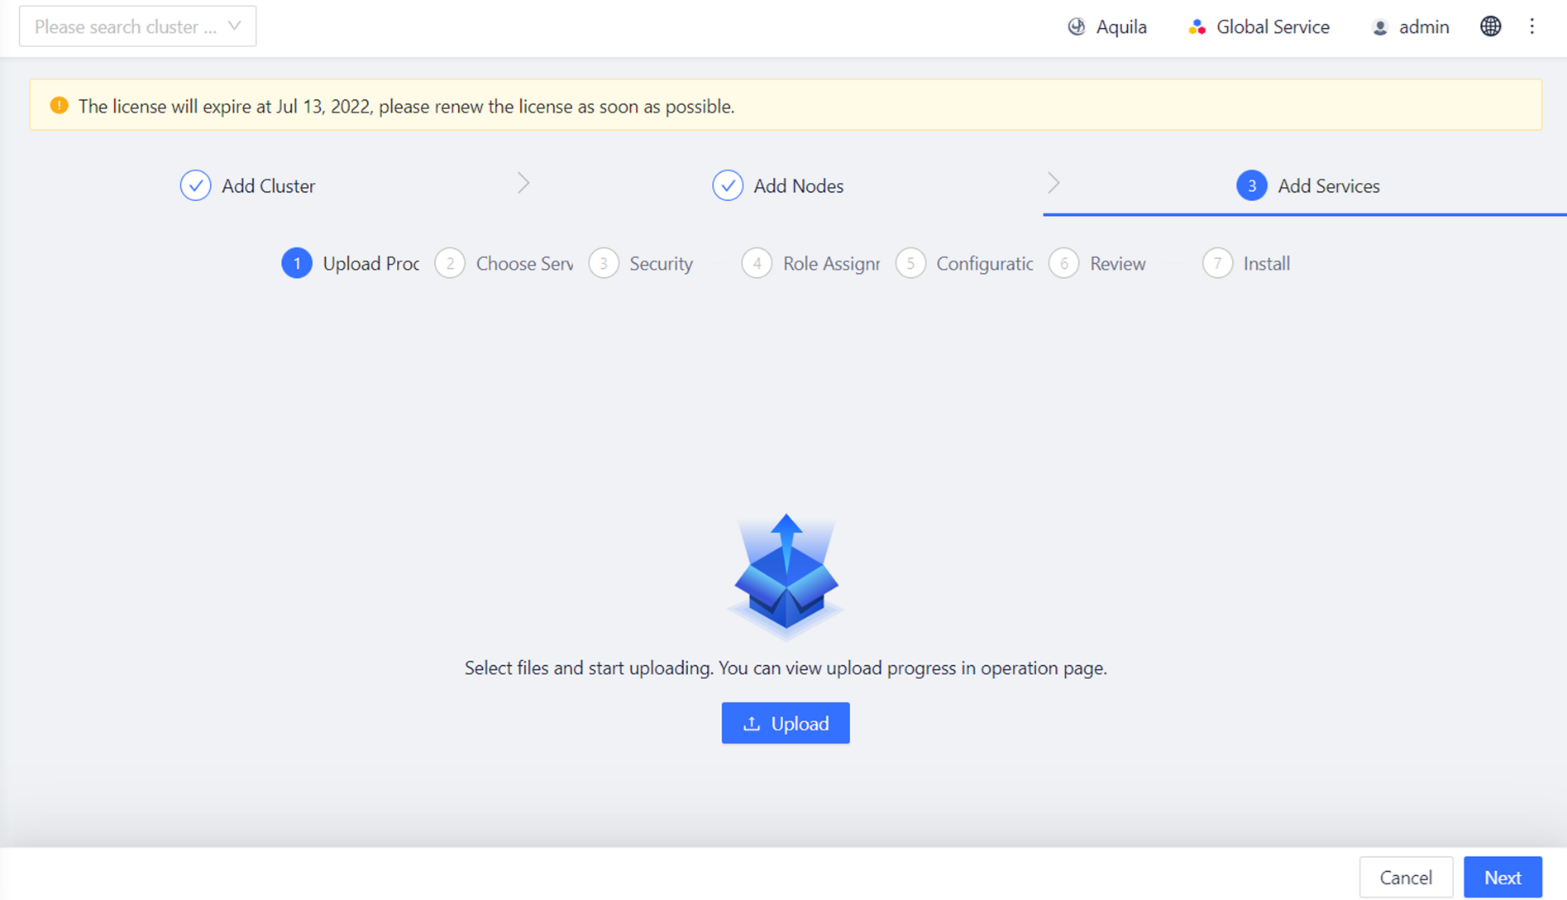
Figure 7-1 Upload Product Package
In this interface, users can directly click Upload to select the product package to be uploaded. Users can also click Cancel to return to the main interface of Manager, and then follow the steps below to upload the product package:
-
Click the Application Market from the Manager menu and click the Product Package from the left navigation bar.
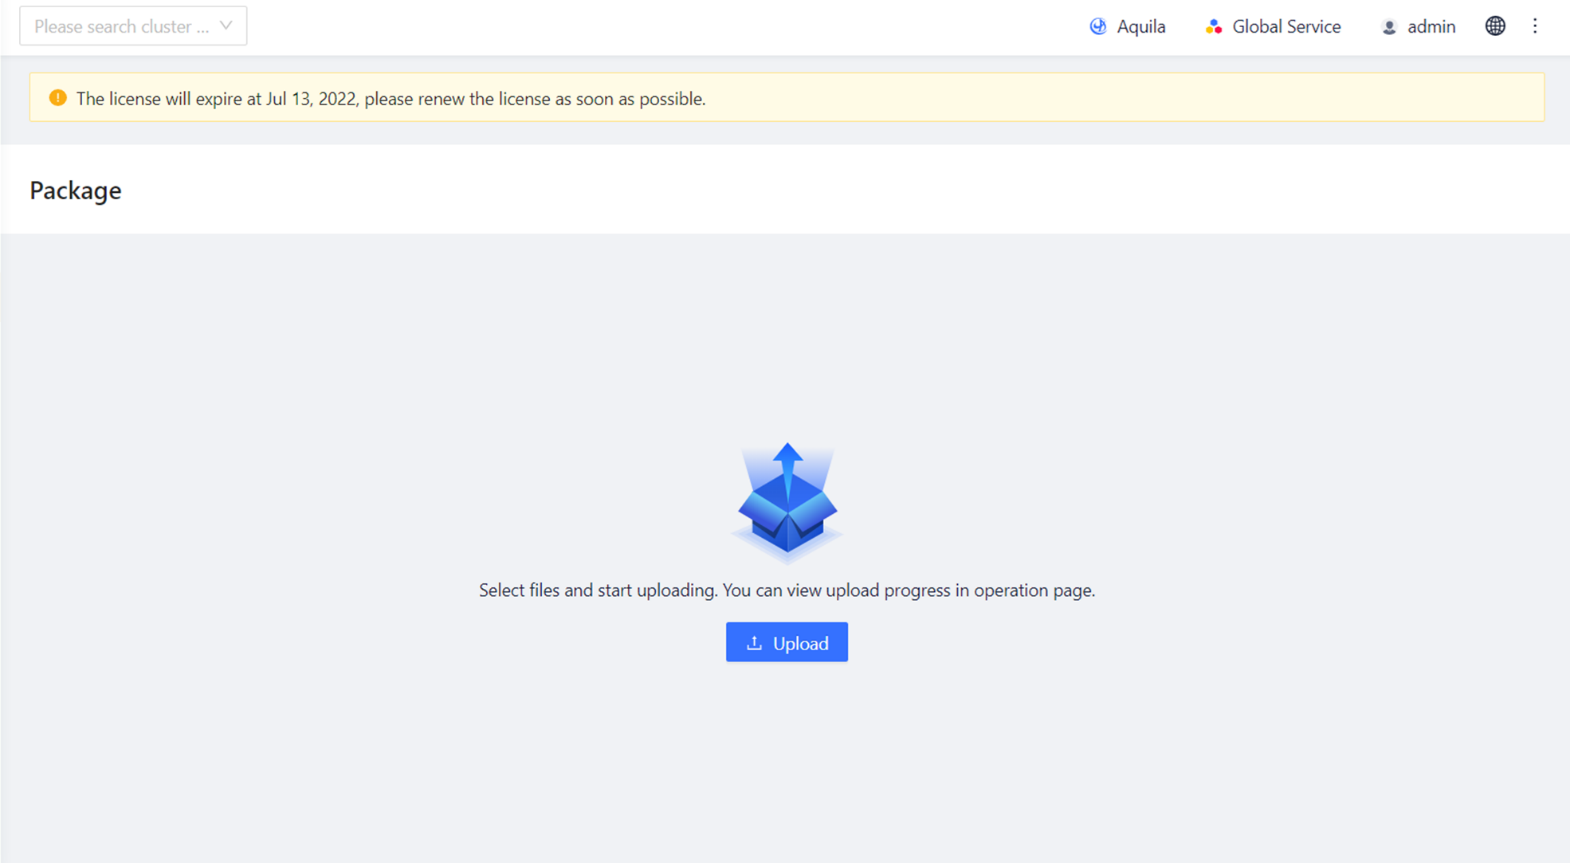
Figure 7-2 Page-Upload Package
-
On the product package upload page, click Upload and select the product package location in the following pop-up window:
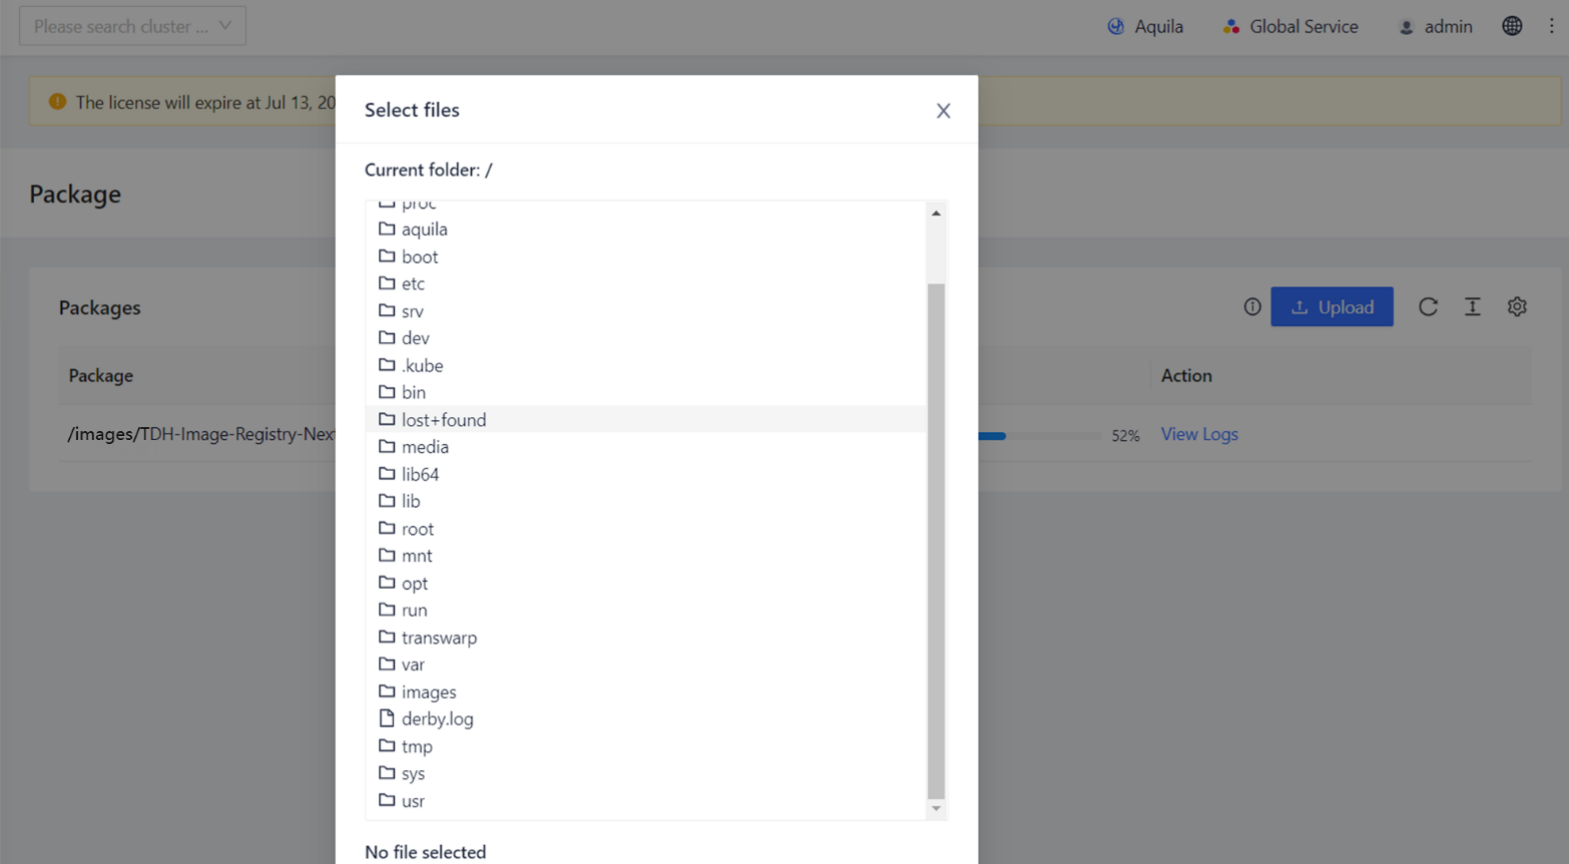
Figure 7-3 Upload and Select the Product Package
-
Upload will take some time, and users can see the state icon when it is finished. Users can also click View Logs on the right side of the product package to view the upload process.
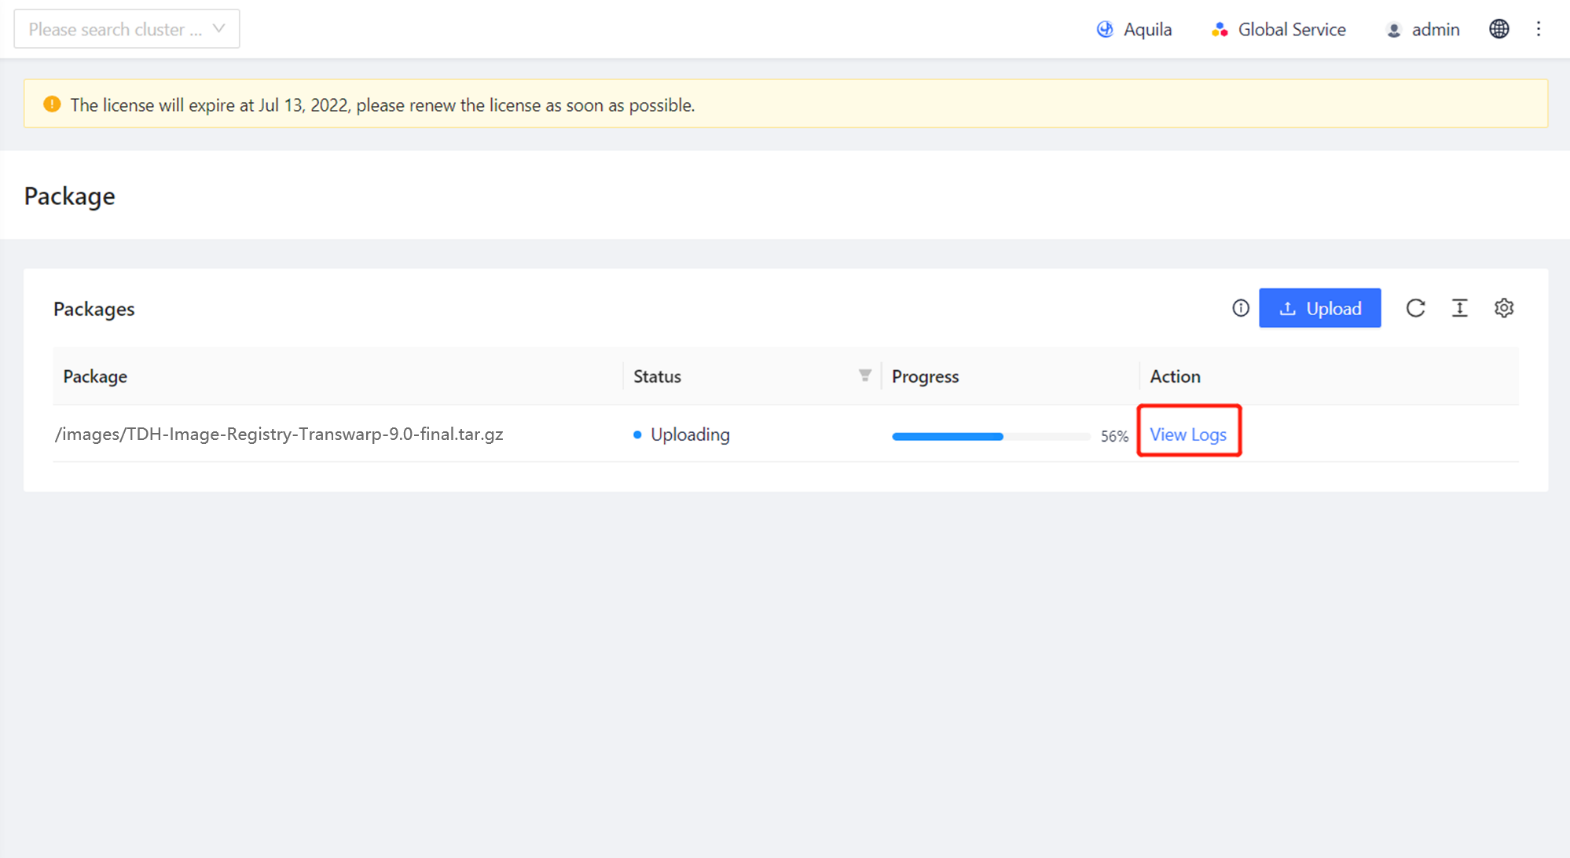
Figure 7-4 View Logs
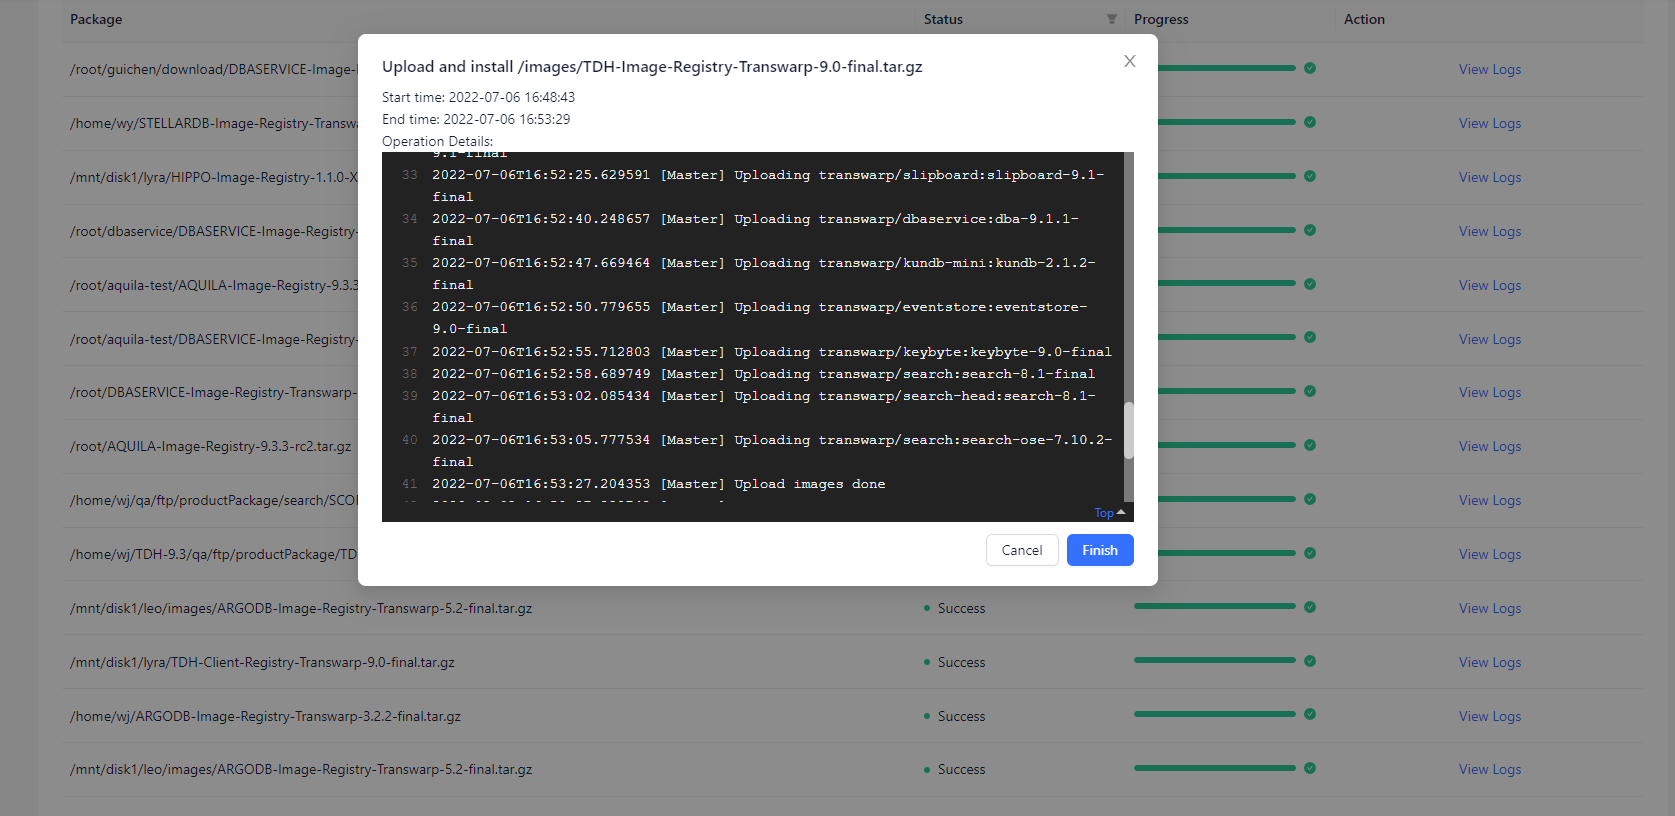
Figure 7-5 Log Display
-
After the upload is successful, the corresponding service will appear on the Service Selection page when installing the service.
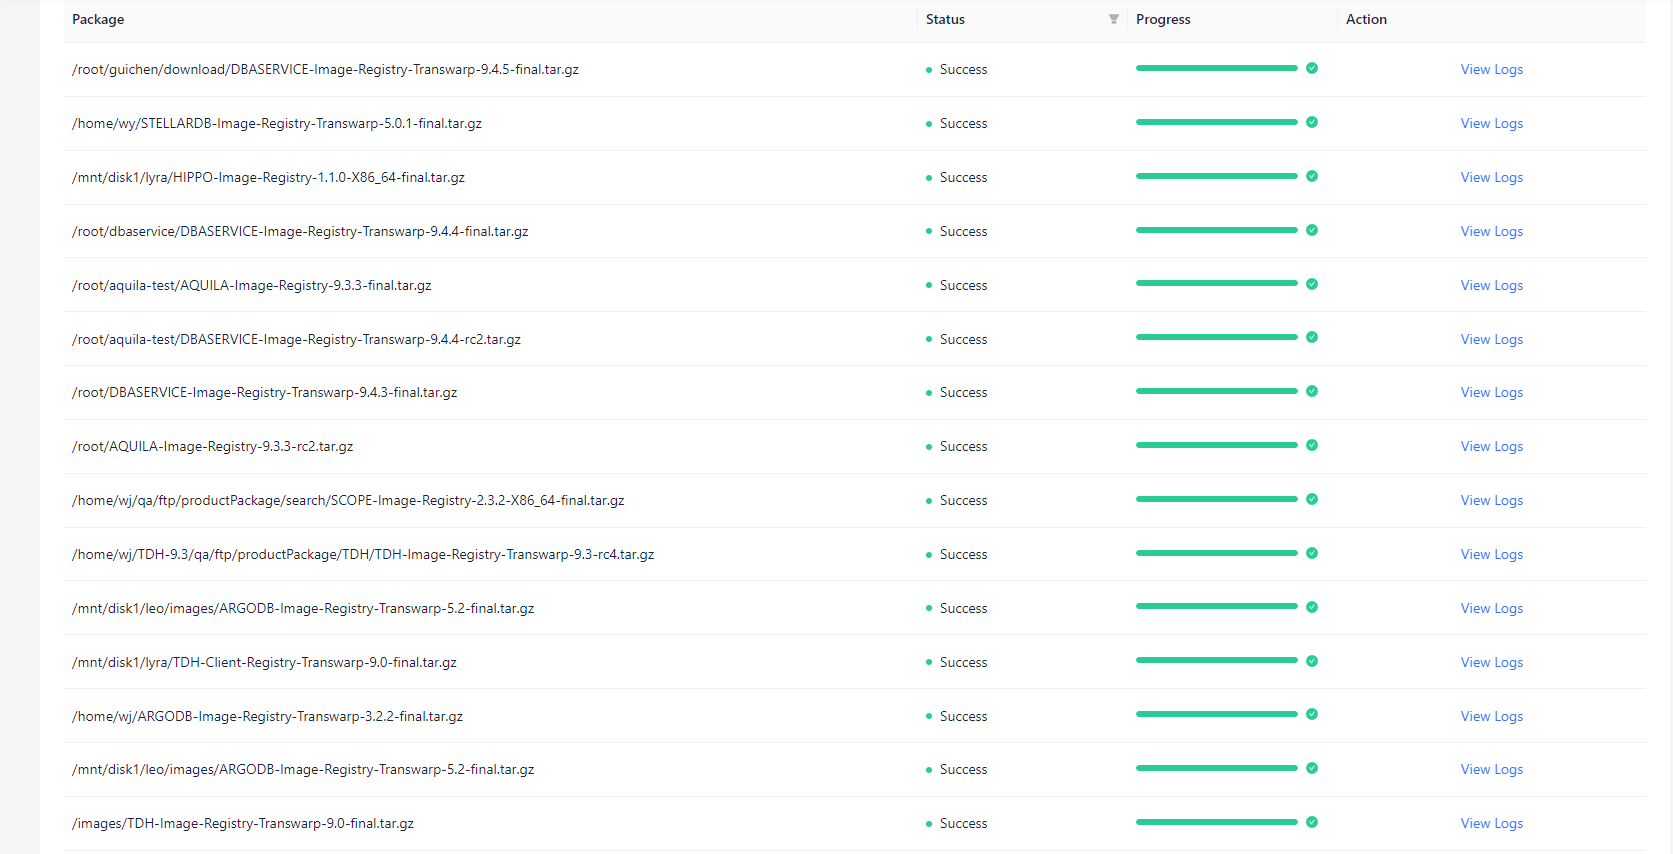
Figure 7- 6 Package Upload
Service Selection
Before installing the service, please reconfirm that users have assigned resources as required by the Chapter 3. Pre-installation Inspection and that they have successfully upload the product package. Only products with a successful product package upload will appear on the Select Service page.
In TDH, the individual services will be packaged as containers and installed on TCOS. TCOS is a cloud operating system based on Docker and Kubernetes, and will not appear in the list of services when deploying and installing TDH services, which are installed by default and do not need to be added by users manually. However, users can assign roles and configure parameters and attributes for the TCOS service in the subsequent steps Service Role Assignment and Configuring Service page.
Kindly note
Before installing TxSQL, please ensure that at least 200G of space is reserved for TxSQL on one of the data disks and that the data dir of TxSQL is set to one of the directories on that disk.
-
The left side is a selection of products and versions of services, and the right side is the specific service. When a product is uploaded, all services belonging to that product will be listed on the right side.
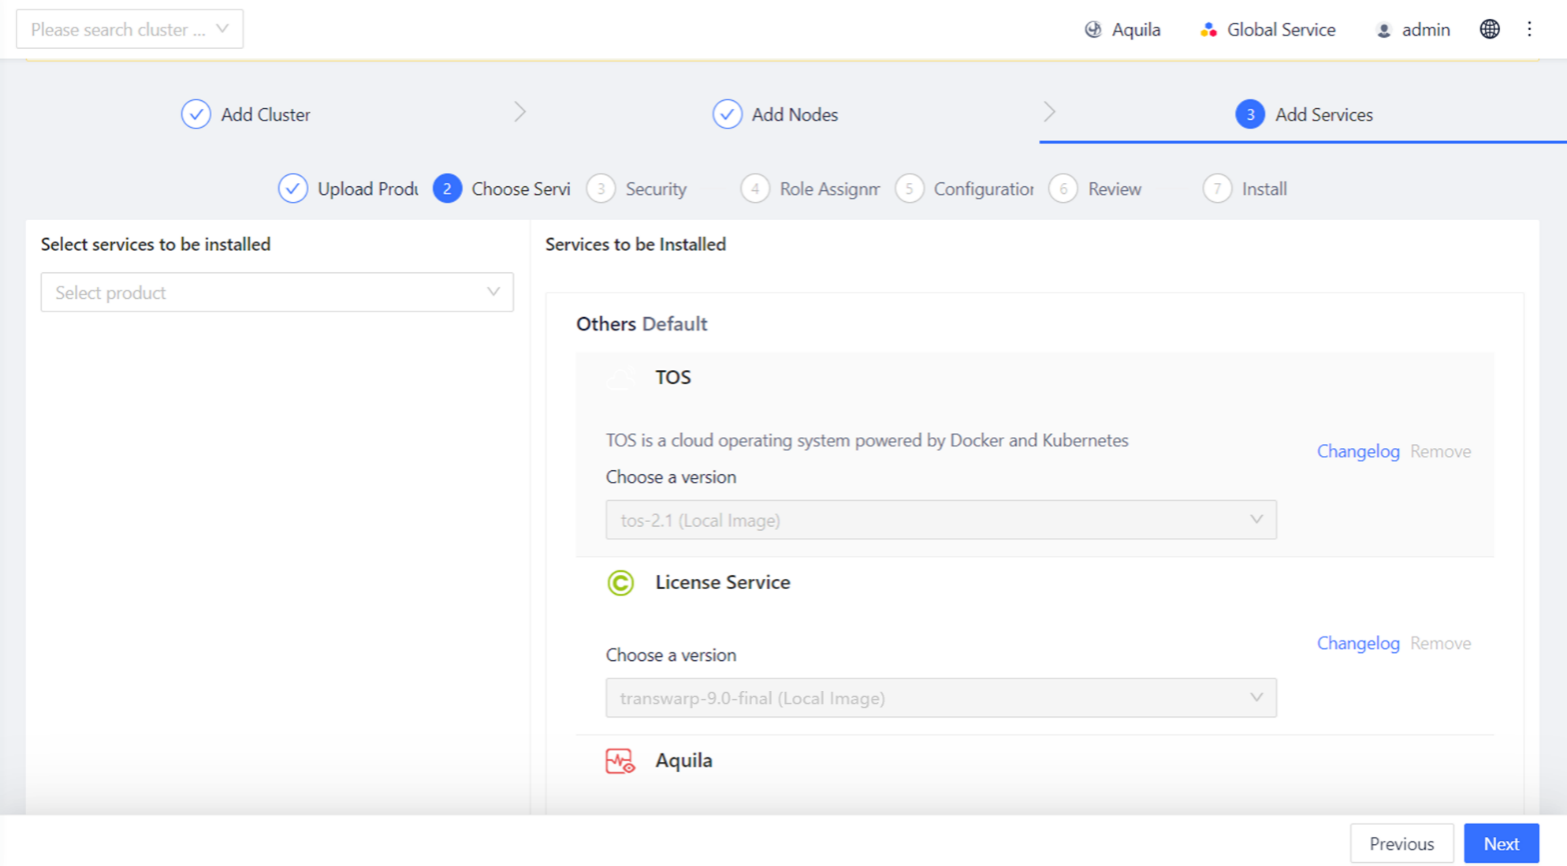
Figure 7-7 Select Products
-
If users have uploaded more than one version of a product package, users can click to select the version users want to install.
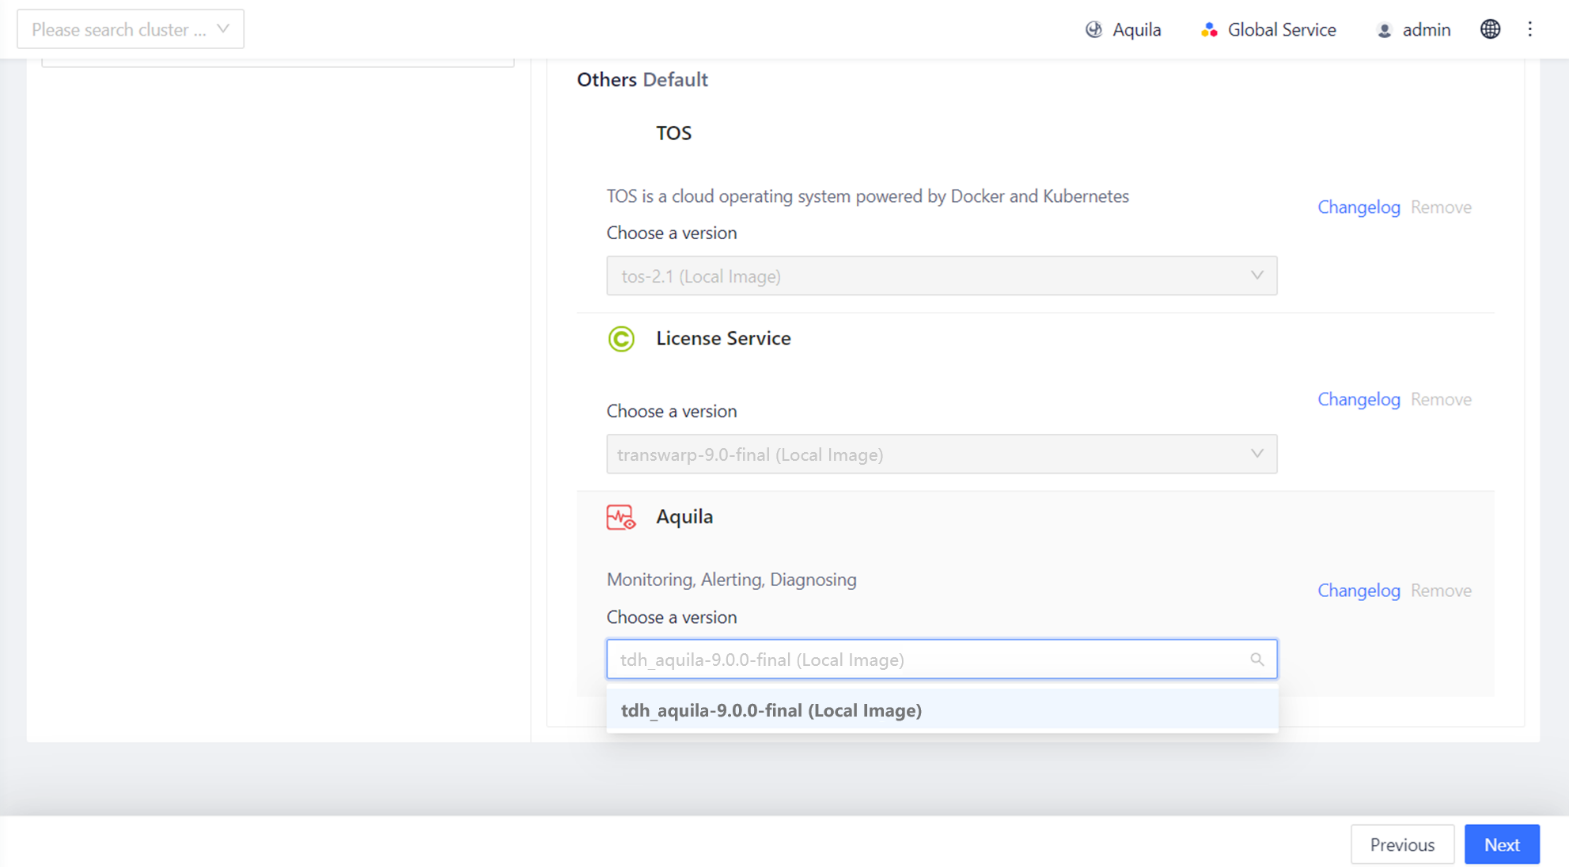
Figure 7-8 Select Versions of Services
-
Click "Next" to install the selected service.
Security Configuration
Users can configure security in this step. If users do not currently have Guardian installed, users can choose Simple Authentication Mode. If users have Guardian installed, users can select Kerberos Authentication Mode in this step and enter the KAdmin ticket name and password to enable the Guardian plugin.
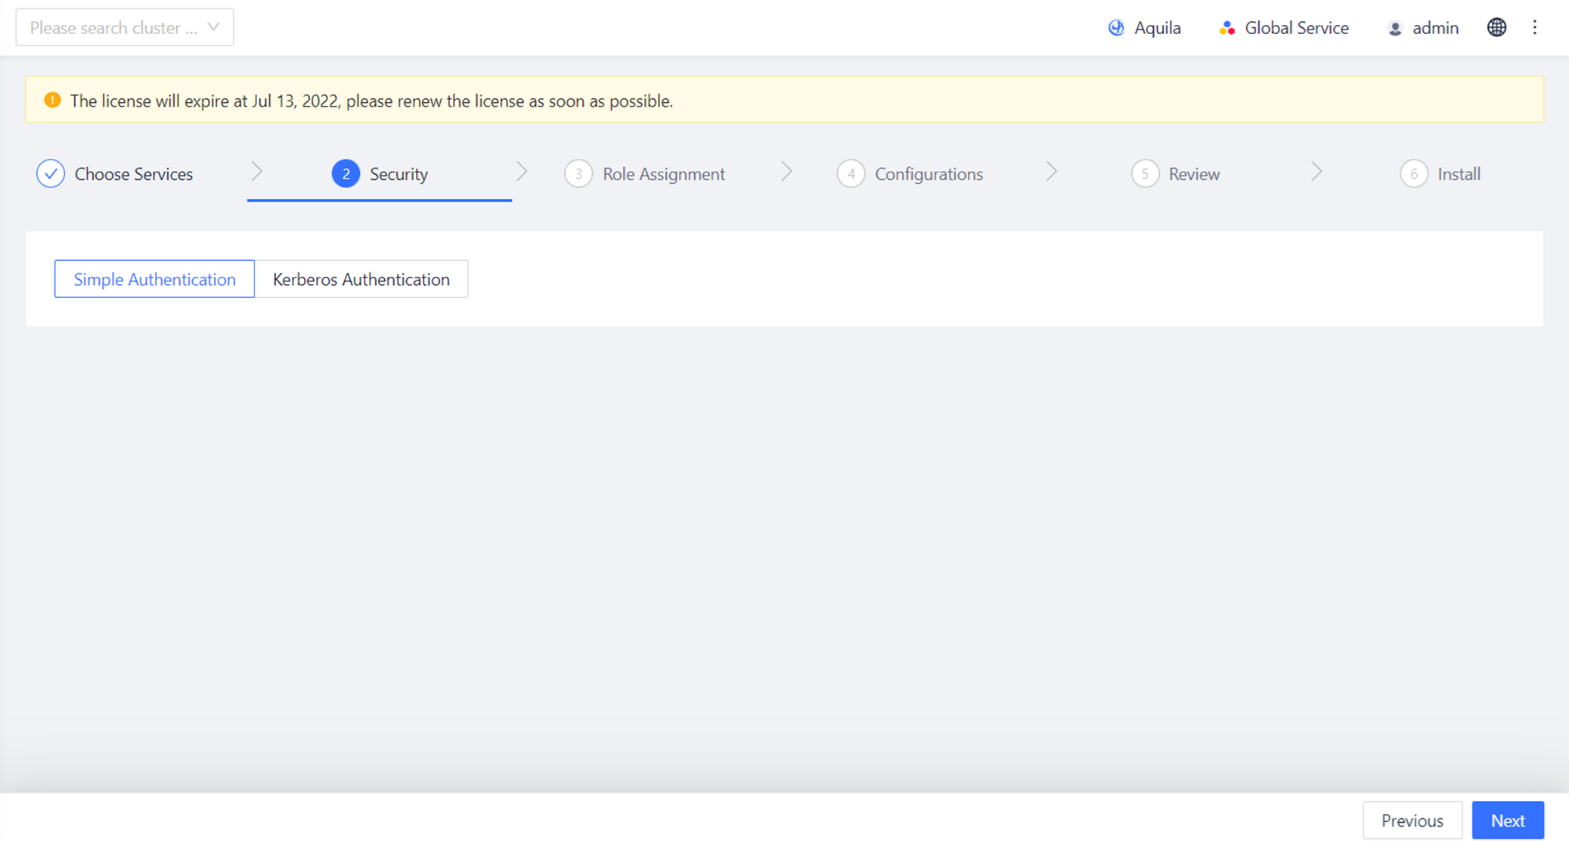
Figure 7-9 Security Mode -- Simple Authentication
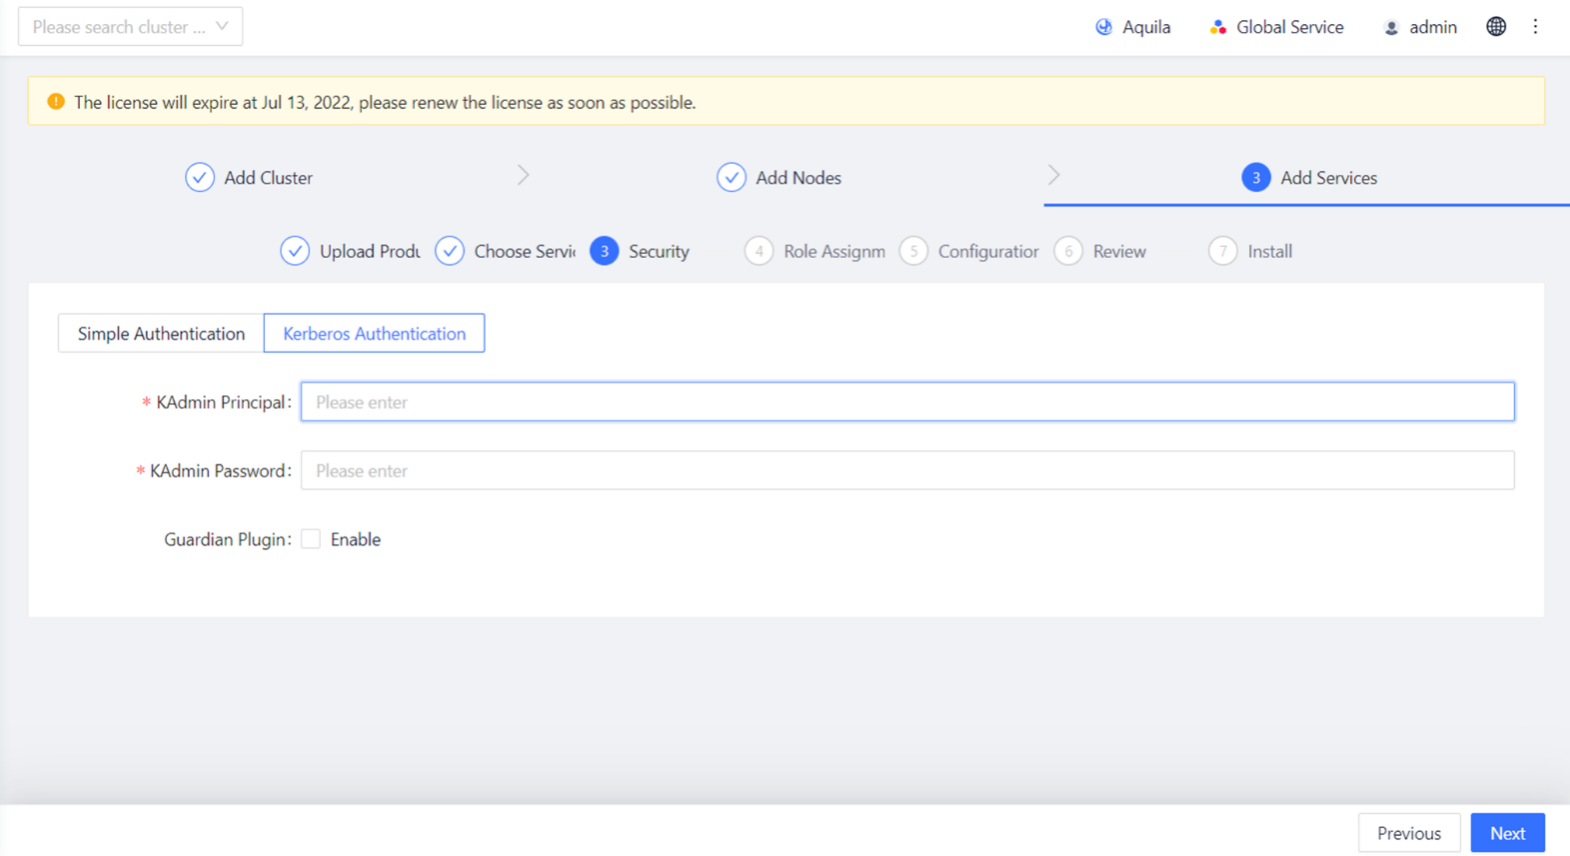
Figure 7-10 Security Mode -- Kerberos Authentication
Service Role Assignment
After selecting the services users want to install, assign the role of each service. Each service role relates to several checkboxes, where each checkbox represents a node in the cluster. To assign the role, just check or uncheck the corresponding node on the right side of the service. The checked node will assume the service role. For example, in the figure below, four checkboxes are checked, indicating that these four nodes in the cluster will assume the TOS Slave role.
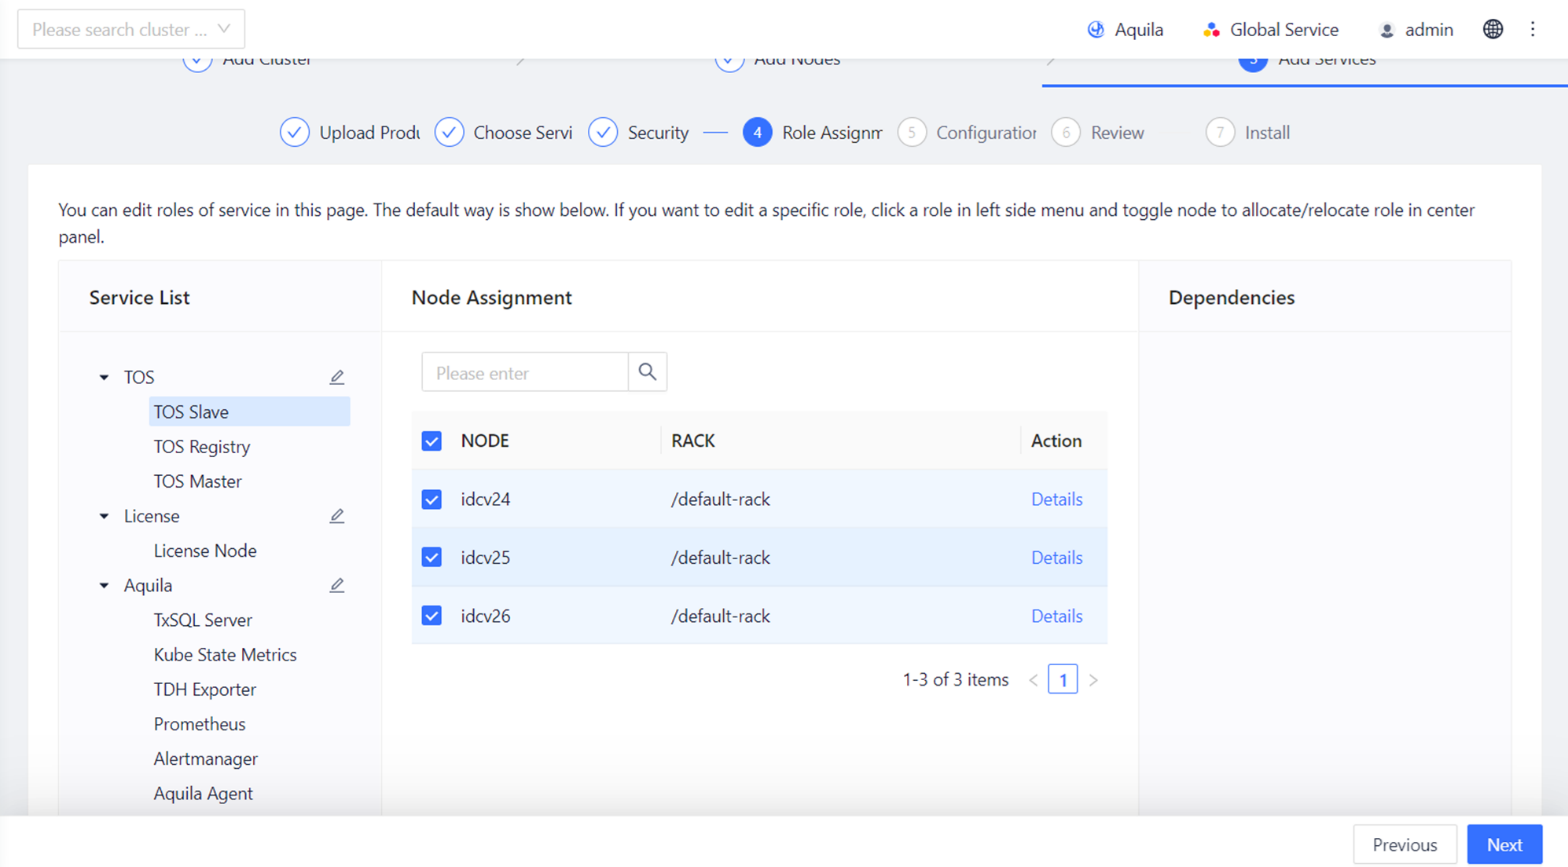
Figure 7-11 Role Assignment
Manager provides default assignment for the role of the service. If users want to use the default assignment, users can click "Next" to go straight to Configuration. But we recommend that users plan according to the actual production scenario. At the same time, we recommend that users follow the following assignment principles:
- The TCOS role and the License role need to be installed when the cluster is first installed. The TOS Registry role must be installed on node where Manager is located. The TOS Slave role needs to be installed on each node.
- It is recommended that the Zookeeper role be assigned to an odd number of nodes, with a recommended cluster size of 3 under 20 nodes and 5-7 over 20 nodes, with no more than 7.
- When cluster resources are ample, assign the HDFS NameNode and DataNode to different nodes, that is, avoid the same node being both a NameNode and a DataNode.
- It is recommended that the Hyperbase Master role be assigned to an odd number of nodes.
- A node assigned a Hyperbase RegionServer must also have the HDFS DataNode role.
Deploying Multiple Instances of a Role
Since version 6.0 onwards, Manager supports the deployment of multiple instances of the same role on the same node. If some of the roles of a service support multiple instances, Manager will place each role instance into an instance group after the service is created. Users can simply add an instance group at the Assign Roles step to create a batch of role instances and assign nodes to them.
For example, in the figure below, instancegroup1 is created by default. Click + Instance Group to create the instance group instance2 and assign nodes to it on the right to complete the multi-instance deployment.
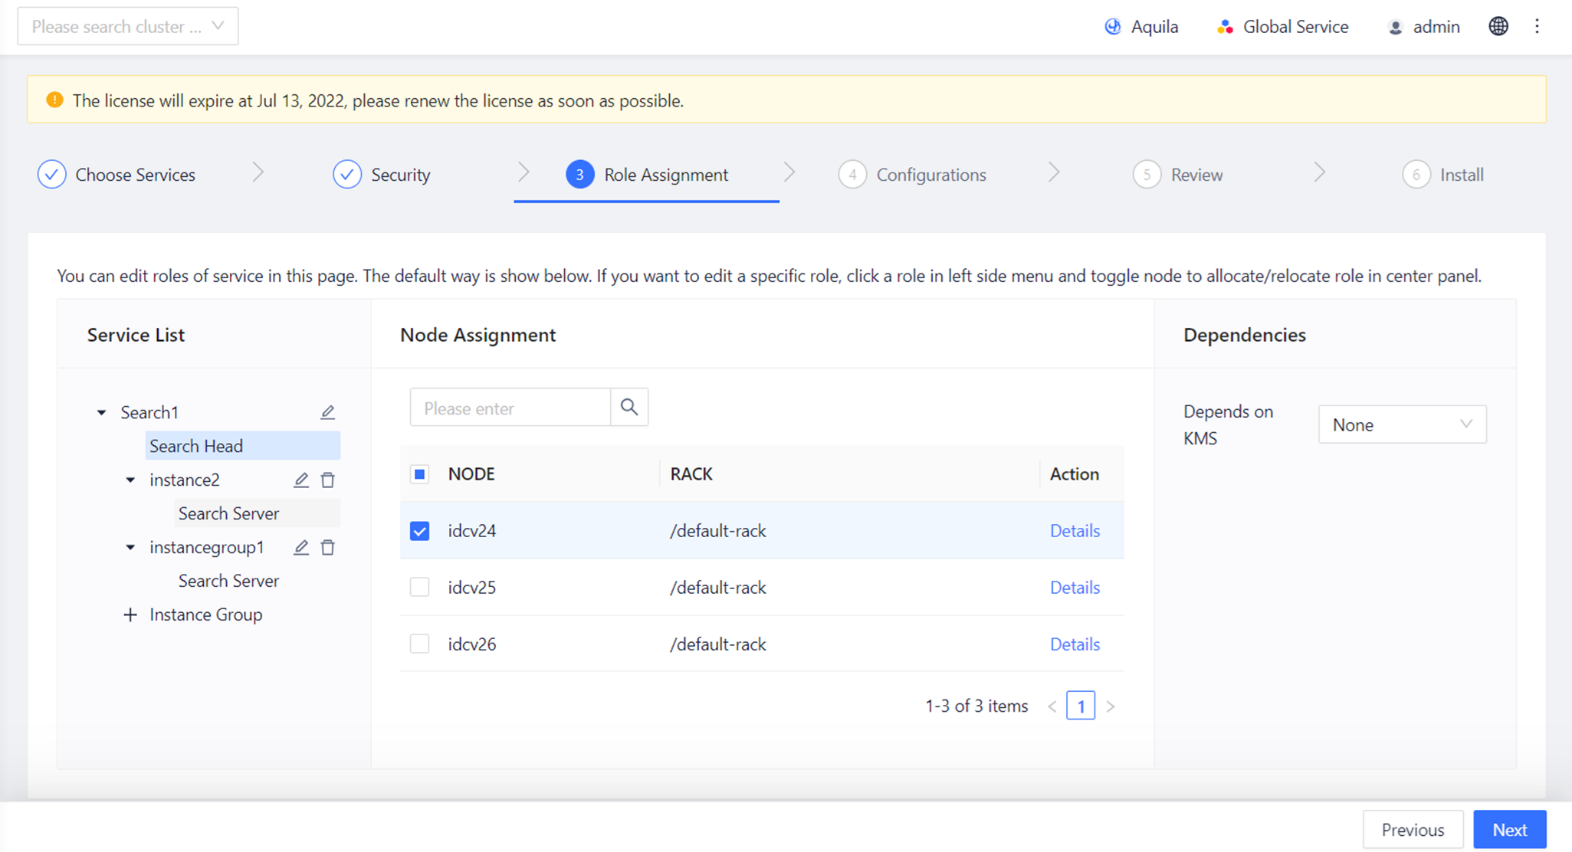
Figure 7-12 Multi-instance Deployment
If users have already installed it, users can also scale-out the role by adding nodes to it from the Nodes page of Manager. For specific steps, please refer to the TDH Operation Manual.
Role Attribute Configuration
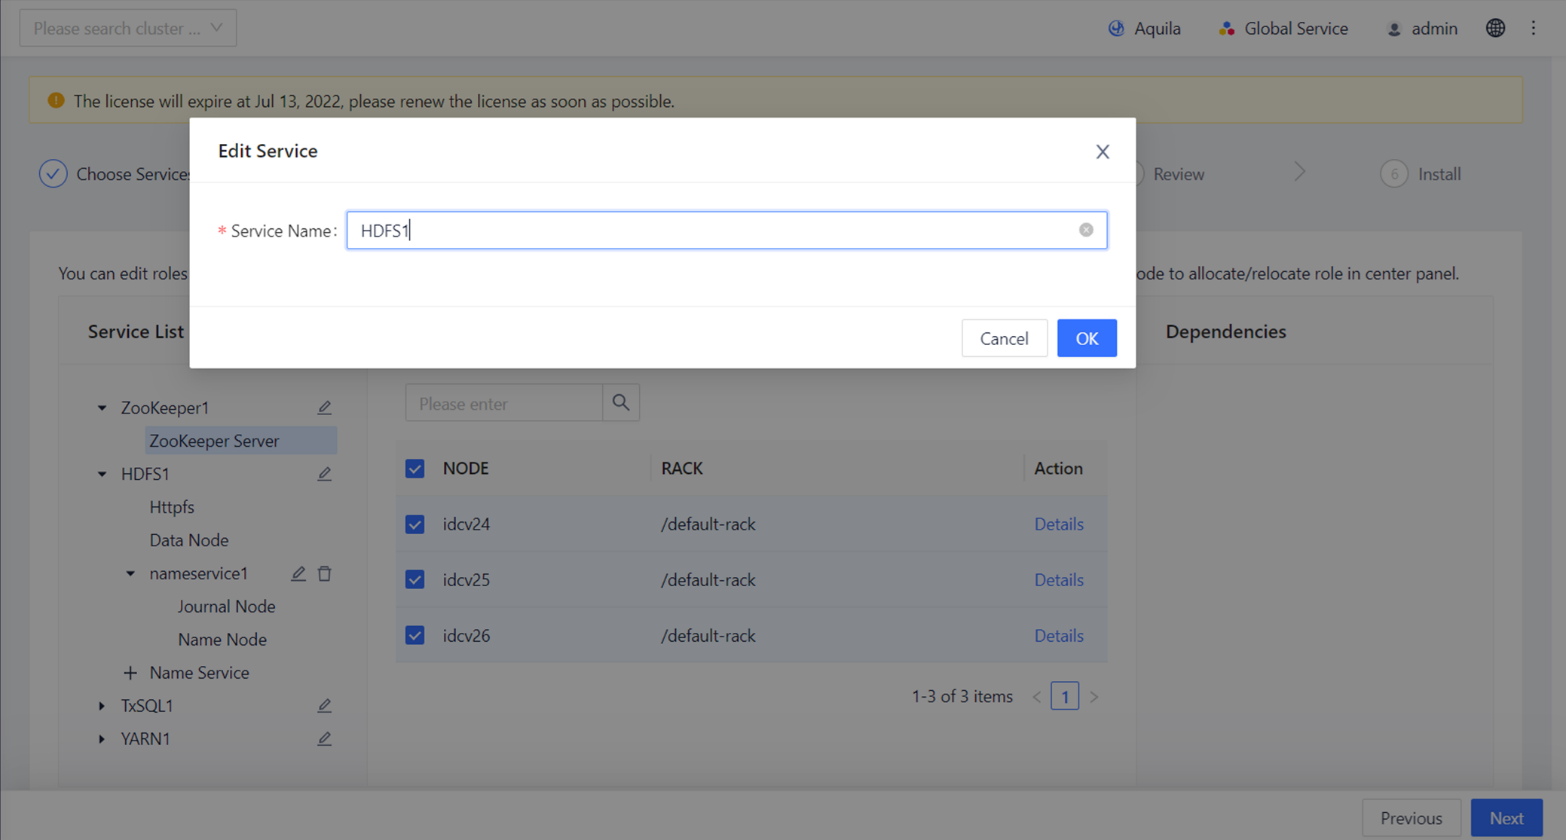
Figure 7-13 Set Service Name
Each service in Data Hub can set the service name in the cluster, which is used for referring to the service in the cluster. The edit page of HDFS service is displayed here.
If not set, the default service name is "Service + Integer", because some services can have multiple instances in the cluster, where the cluster's computing resources allow, and these instances need to be distinguished from each other when they work via service name (e.g., Zookeeper1 and Zookeeper2). When the cluster is installed for the first time, only one instance of each service can be installed. Additional instances of the service can be added to the installed cluster.
Service Configuration
Service configuration is crucial. Please check the configuration of each service carefully in this step. Under "Service Configuration", users can configure all services.
Configurable Items of Service
Every service in Data Hub has a bunch of configurable items. General configurable items include (Zookeeper service as an example):
Basic Parameters:
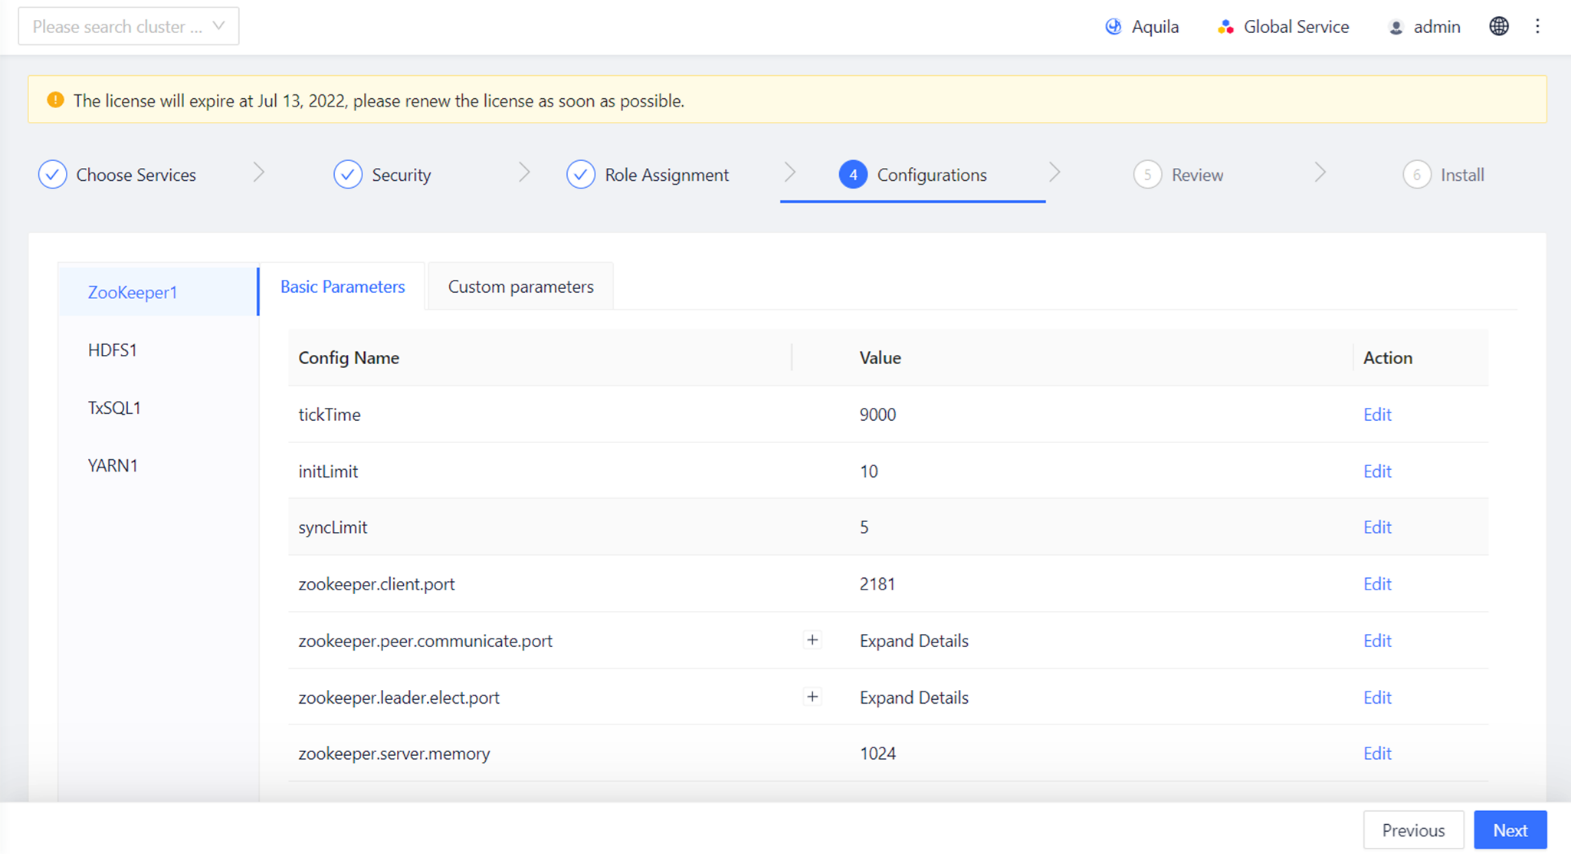
Figure 7-14 Basic Parameters
The basic parameter configuration page of Zookeeper service is displayed here. Unless users have special needs, users can simply use the default values provided by Manager for basic parameters. Basic parameter values can not only be set in this step, but also be modified on the Service Configuration page after installation.
Basic parameters have two types: node-specific parameters (Zookeeper.peer.communicate.port, Zookeeper.leader.elect.port in the figure above) and non-node-specific parameters (tickTime, init.Limit and syncLimit in the figure above).
-
For non-node-specific parameters, users can modify them directly by clicking Edit on the right side.
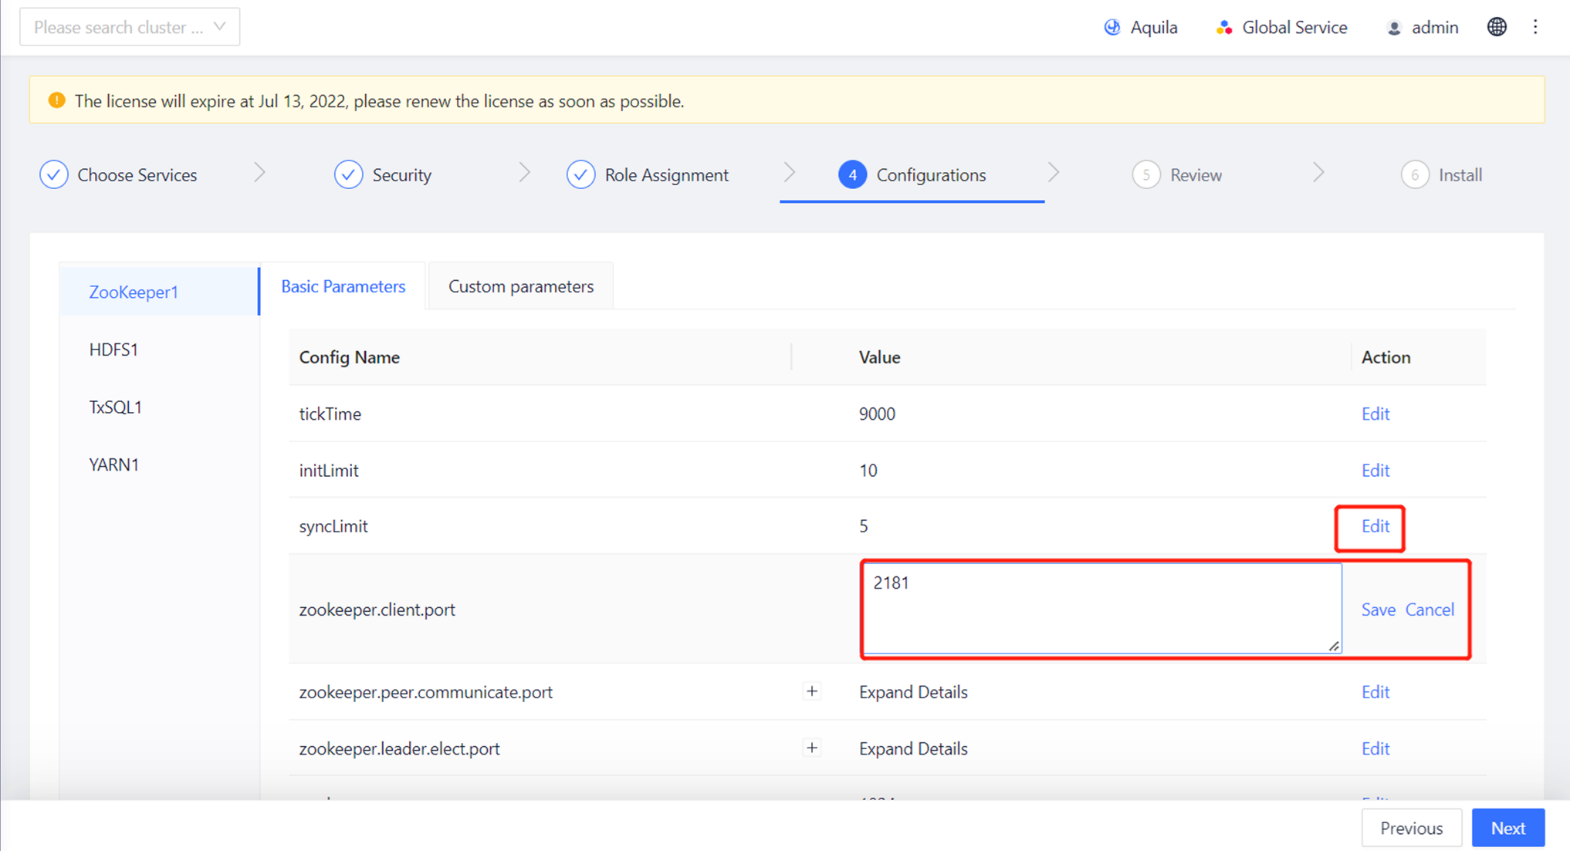
Figure 7-15 Edit Parameters 1
-
For node specific parameters, click Edit in the red box on the right to open the window respectively configured for nodes:
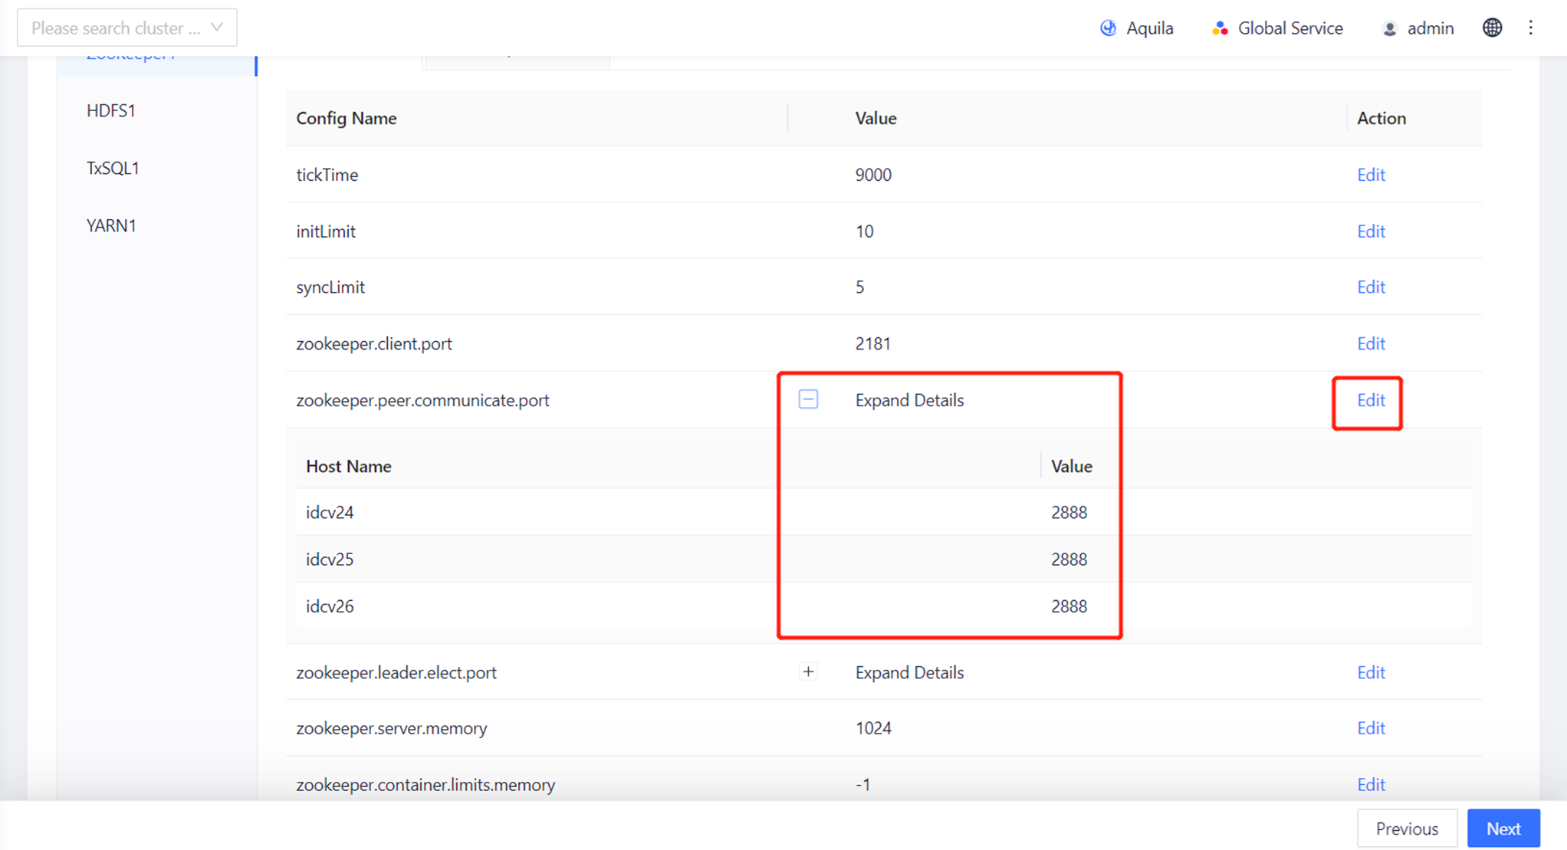
Figure 7-16 Edit Parameters 2
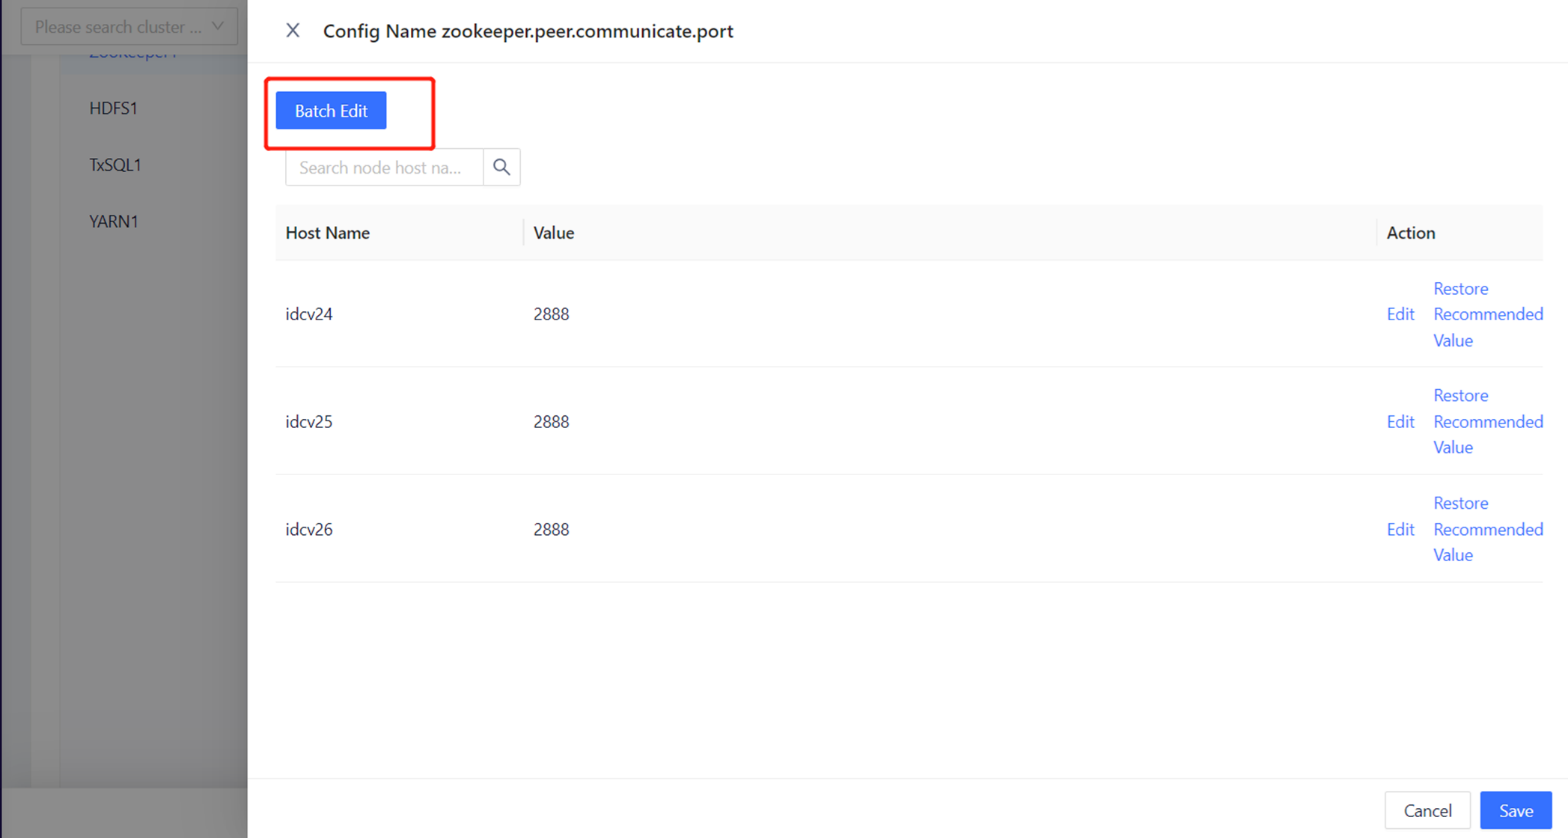
Figure 7-17 Batch Edit
Then, click the value corresponding to the node for modification.
-
Self-defined parameter
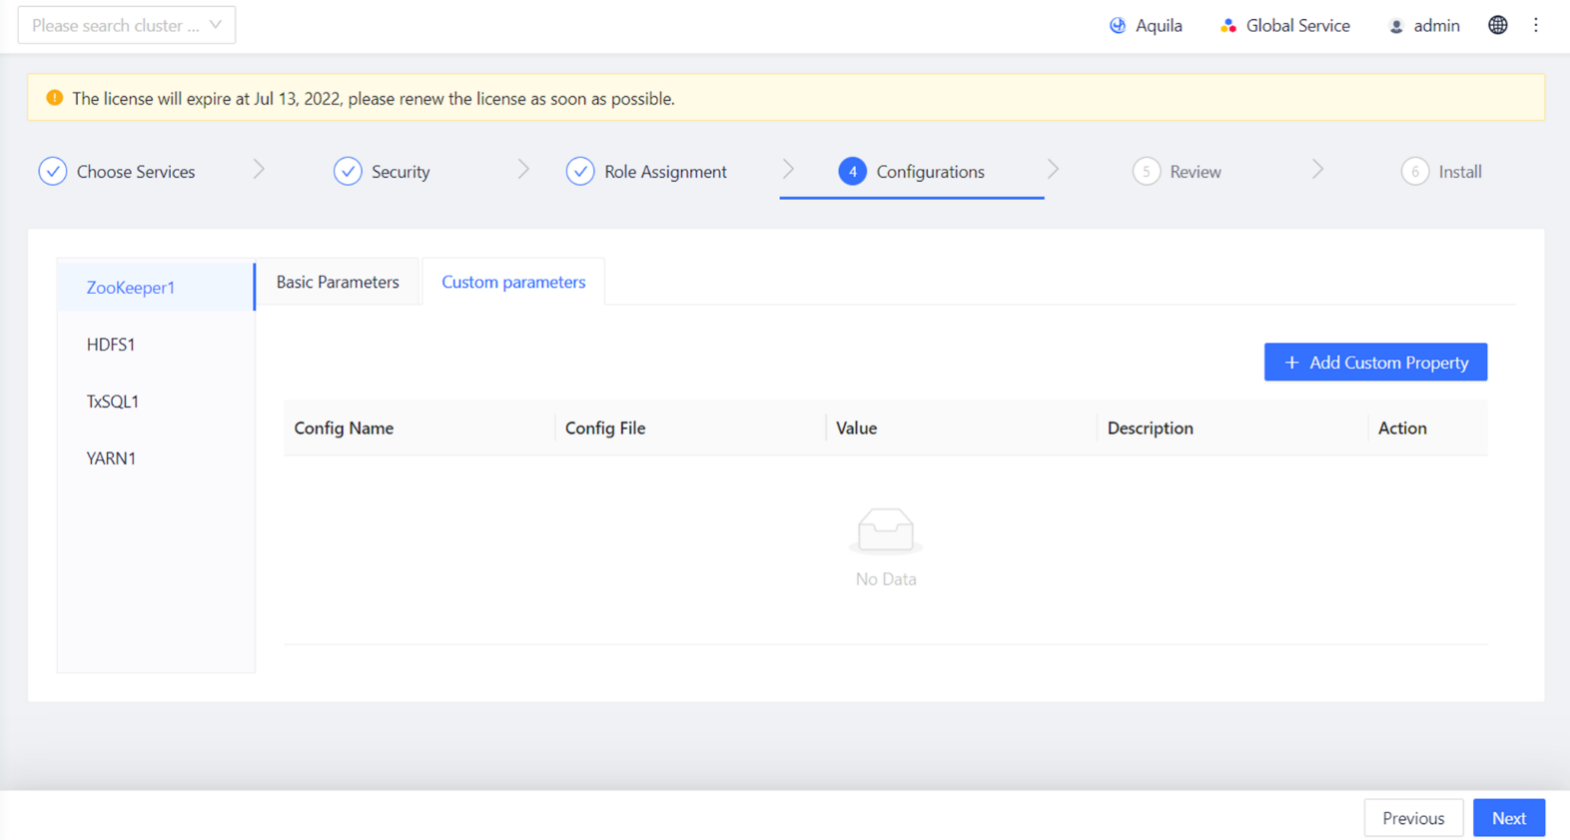
Figure 7-18 Edit Self-defined Parameter
Self-defined parameter can be added for all services. The self-defined parameter configuration page of Zookeeper service is shown here.
-
Attribute
Some services in the Data Hub can be configured with attributes. The attribute configuration page of the Guardian service is shown here.
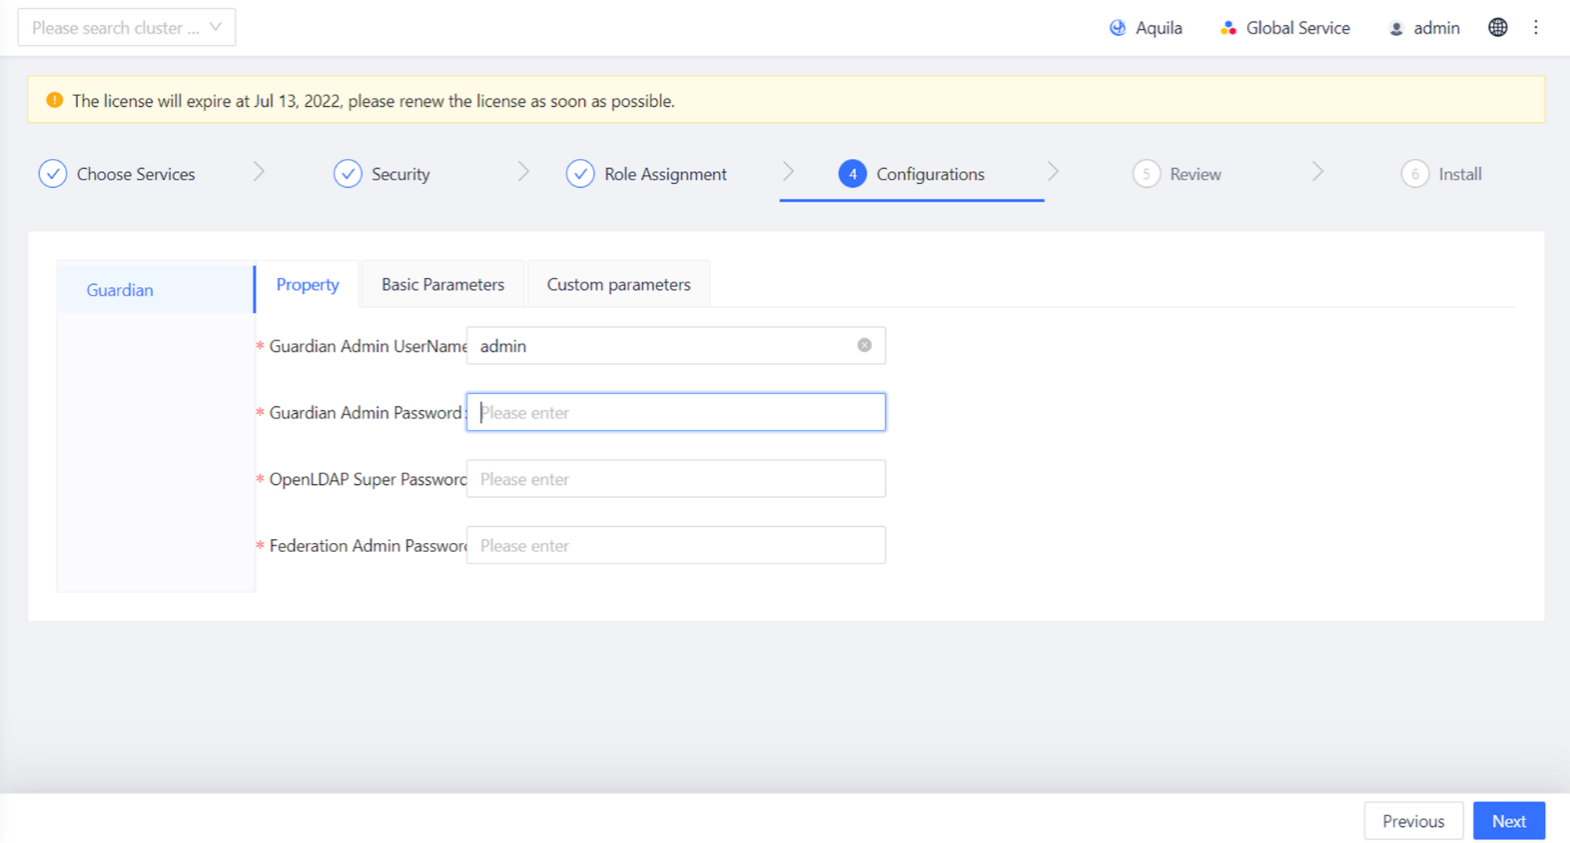
Figure 7-19 Attribute Configuration Page
Special Configuration Requirements
TDDMS parameter configuration
Please note that during the deployment of tabletserver.store.datadirs parameter, all mount points on the localhost with a capacity greater than 200GB are selected as data directories by default. If there is no mount point with a capacity greater than 200GB on the localhost, please specify the data directory manually.
Configuration requirements for specific roles
Since NameNode, JournalNode, TCOS Master's etcd, TxSQL, Guardian ApacheDS, Zookeeper and other services or roles have high disk IO requirements, it is required that these services or roles directories should not be on the same disk, and not all of them should be on the system disk. If possible, they should not be installed in the system root directory.
The disk configurations or paths used by the above services or roles are listed below. Please check whether the value path of the relevant configuration item is correct.
| Service | Role | Configuration item/path |
|---|---|---|
| TOS | TOS Master (etcd) | /var/etcd/data/ |
| Zookeeper | Zookeeper Server | /var/<service_id>/, such as /var/Zookeeper1/ |
| HDFS | Name Node | dfs.namenode.name.dir |
| Data Node | dfs.DataNode.data.dir | |
| Journal Node | Configuration item dfs.journalnode.edits.dir in hdfs-site.xml, /hadoop/journal by default | |
| TxSQL | TxSQL Server | data.dir and log.dir |
| Guardian | ApacheDS | guardian.apacheds.data.dir |
| TxSQL Server | data.dir | |
| Manager (when HA is on) | TxSQL Server | /var/lib/transwarp-manager/master/data/txsql/ |
Table 7-1 Disk Configurations or Paths
Services Installation
-
After configuring the parameters, click "Next". Then, users can see the general configuration information in the window as follows. If modification is required, click "Previous" to go back for modification.
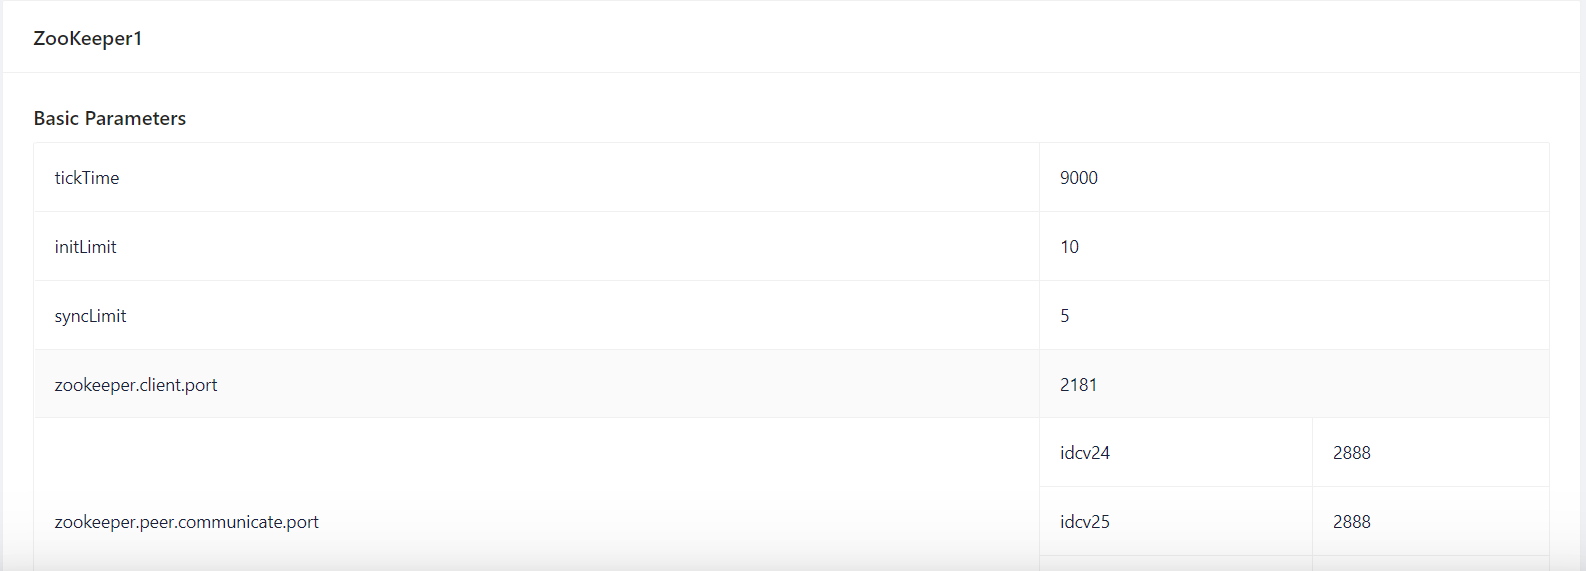
Figure 7-20 Check Parameters
-
After confirming the configuration information, click "Next" to prepare for installation.
-
At this point, Manager will pop up a "Confirm Installation" window to confirm the installation. Click "OK" to continue.
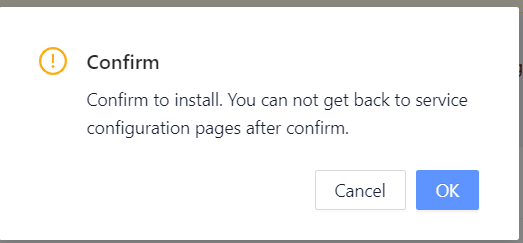
Figure 7-21 Confirm Installation
-
Installation begins. The system will take some time to install the selected service. Please wait patiently.
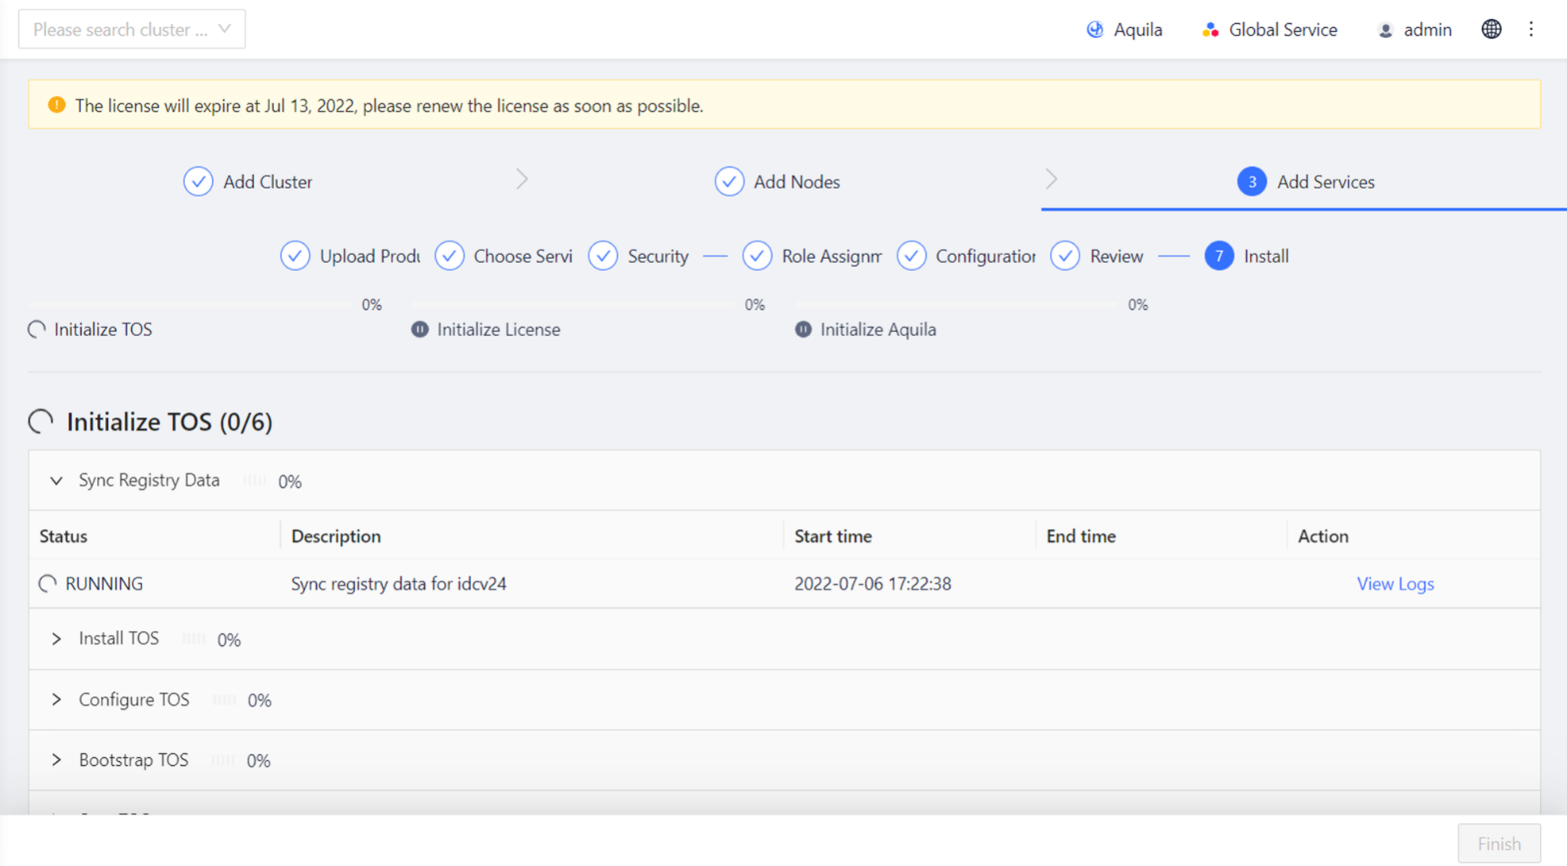
Figure 7-22 Services Installation
-
After installation, click "Finished" to enter the control panel of Manager.
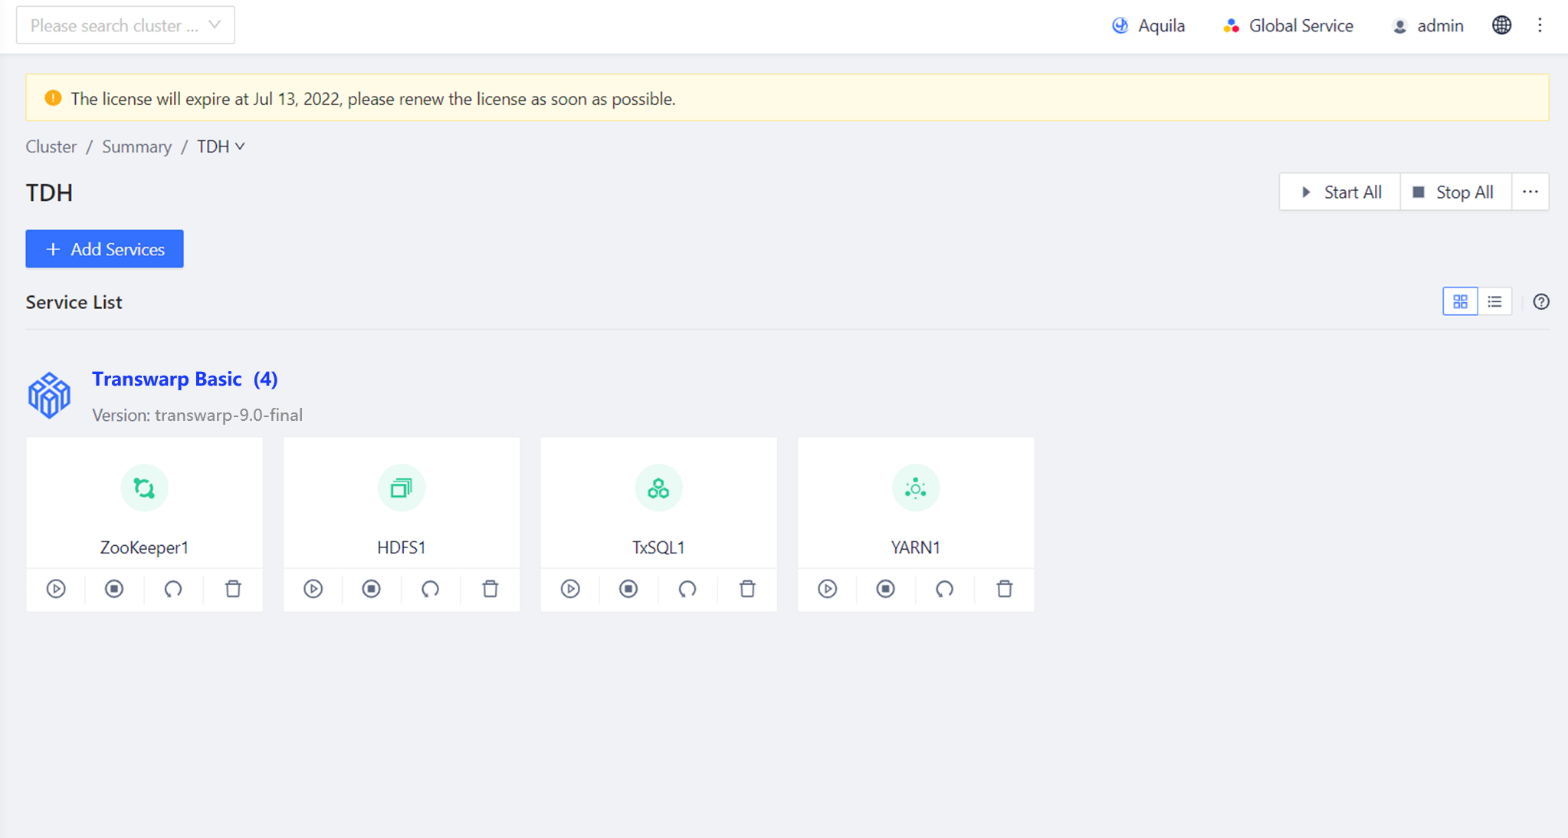
Figure 7-23 Control Panel of Manager.
Install TDH Client
After the service installation is completed, the user must install the TDH client before executing the command line of each service on the interactive interface, such as beeline, hdfs dfs, etc.
Installation Procedure
The installation process is as follows.
-
Get installation package
On the Manager interface, click ⋮ to download the TDH client.
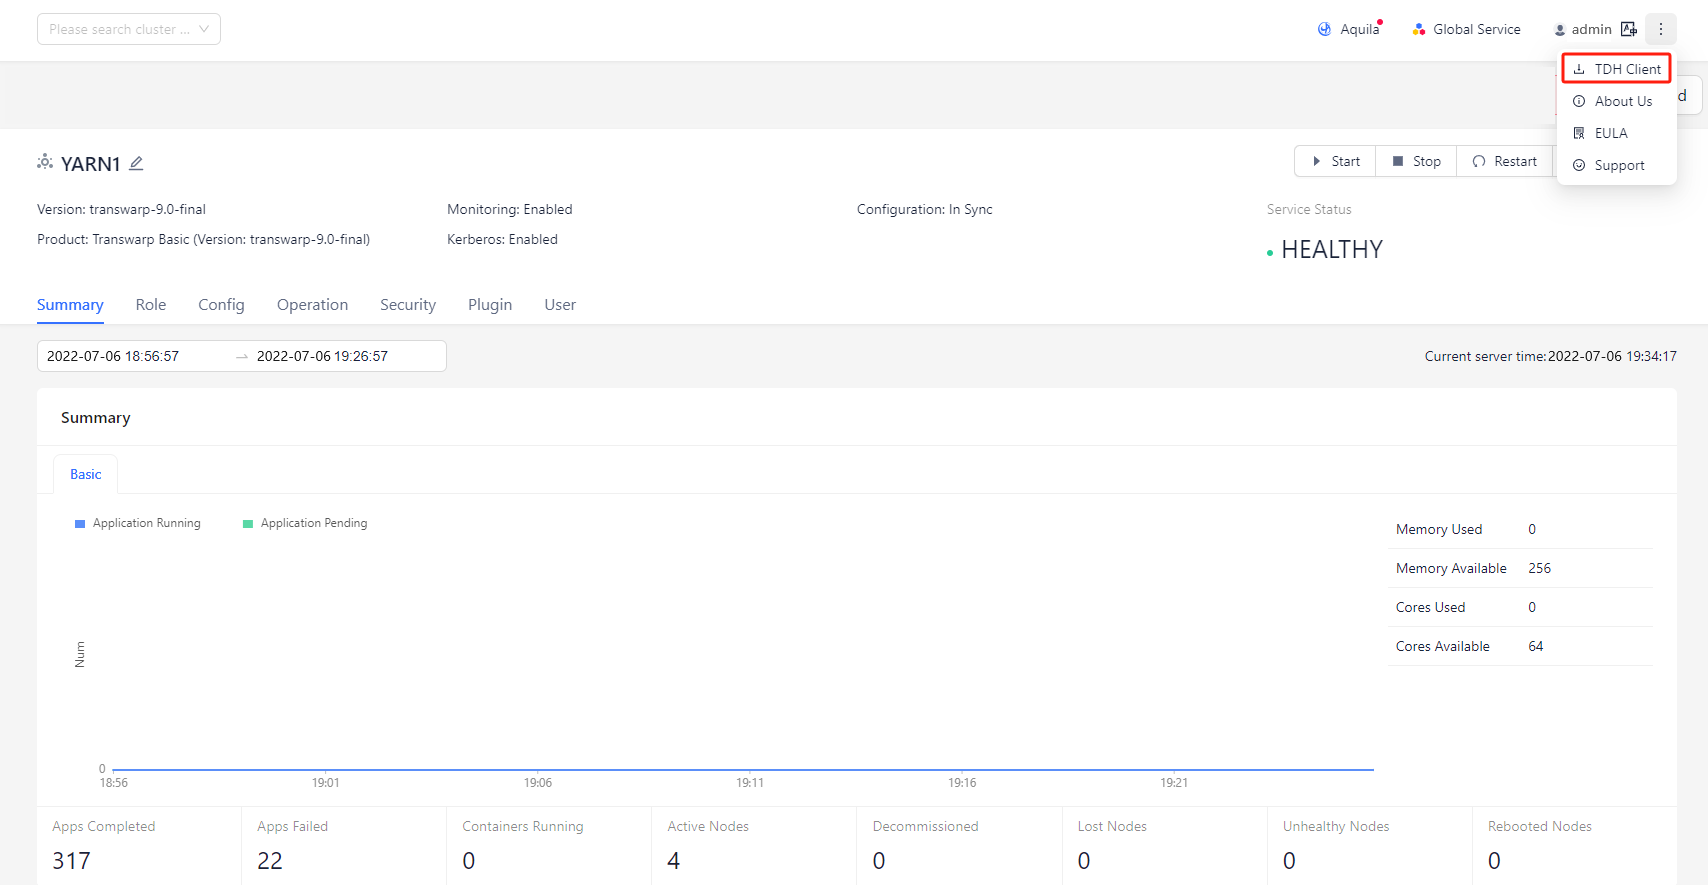
Figure 7-24 Get TDH Client Package
-
Unzip the file
Save the downloaded TDH-client.tar file on any machine in the cluster, and then execute the following command on that machine to unzip the file:
tar -xvf TDH-client.tarAfter successful execution, the file will be unzipped to the directory TDH-Client.
-
Execute script
Please execute the script init.sh in directory TDH-Client.source TDH-Client/init.shUsers can execute this script with any user ID, but we recommend that users execute it with root user ID. When executing this script with other user ID, users need to enter the root password.
Kindly note
- Users must execute the script using the source command. Neither bash init.sh nor ./init.sh works.
- The script accepts two parameters, both of which are y by default. The first parameter indicates whether to modify the /etc/hosts file (y means to modify and n means not to modify), and the second parameter indicates whether to install the Kerberos Client (y means to install and n means not to install).
Therefore, there are combinations as shown in the following table:
| COMMAND | MEANING |
|---|---|
| source TDH-Client/init.sh | Modify the /etc/hosts file and install the Kerberos client |
| source TDH-Client/init.sh y y | Modify the /etc/hosts file and install the Kerberos client |
| source TDH-Client/init.sh y n | Modify the /etc/hosts file without installing the Kerberos client |
| source TDH-Client/init.sh n y | Install the Kerberos client without modifying the /etc/hosts file |
| source TDH-Client/init.sh n n | Do not modify the /etc/hosts file and do not install the Kerberos client |
Table 7-2 Script Examples
After executing the script with the source command, no ERROR in the output results indicates success. In this case, execute related service commands directly.
Kindly note
- The TDH client can be used on any machine inside or outside the cluster. Currently, only Linux operating system (CentOS, Ubuntu, etc.) is supported, and windows operating system is not supported.
- If the user modifies the configuration file of the services in the cluster (for example, Kerberos is enabled instead of being disabled), the TDH client needs to be downloaded again and reinstalled.
- After Kerberos is enabled, run Kinit before executing commands of related services.
- The TDH client will not automatically copy the KeyTab file. Therefore, when there is no keytab file available on the machine, it is not possible to run kinit through kinit -kt . In this case, users must run kinit with kinit and enter the password of the principal as prompted.
Updated 9 months ago